Chapter 7 - Track Parameters
Every track (Chord, Melody, Bass) exposes the same set of parameters. This chapter is the reference for what each one does.
You've already met these parameters in passing on Home (Chapter 6), where the PARAMETER Knobs drive the active track's parameters live. This chapter goes deeper: every parameter, what it controls, its range, and any track-specific quirks you should know about.
The mode chapters that follow - Chord (Chapter 8), Melody (Chapter 9), and Bass (Chapter 11) - each introduce their track's PARAMS menu; when a parameter needs more detail, they refer you back here.
How to reach the parameters
There are two ways to change any parameter on any track.
-
Live edits - the PARAMETER Knobs. When a track is active (Chord mode, Melody mode, or Bass mode; or via the active track on Home), the 8 PARAMETER Knobs each expose two parameters - a primary on rotate and a secondary on press-and-rotate.
-
The PARAMS menu. From any mode, press PARAMS to open the full parameter list. Grouped into categories, you can select parameters with the CONTROL Knob, then press-and-rotate CONTROL to change values.
Useful shortcuts
- Press a PARAMETER knob to jump the highlight straight to that knob's primary parameter
- Press and hold CONTROL and press a PARAMETER knob for the secondary parameter.
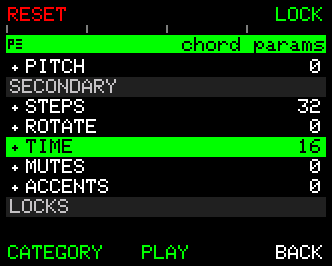
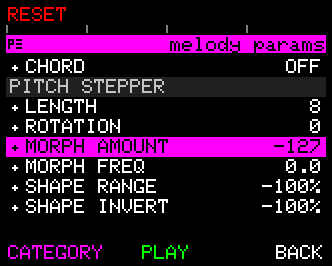
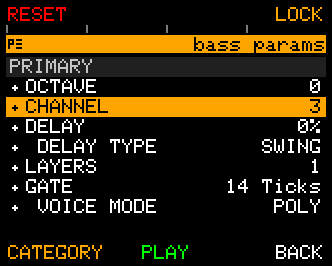
Every parameter lives here, including toggle-style items that don't sit on a knob directly.
Inside PARAMS - the button controls
Track Params mode has 6 CONTROL buttons assigned as:
| RESET | MOD | LOCK/UNLOCK |
| CATEGORY | PLAY/STOP | BACK |
MOD
Makes a modulation for the row you have selected, without going to Modulation Mode and finding the same parameter again in a list of over a hundred and fifty.
If a Modulator is already aimed at that parameter you go straight to it and nothing is written. Otherwise UNA takes a free Modulator slot, points it at your parameter and opens it switched off, at its defaults - turn AMOUNT up and enable it when you want it. One BACK returns you to this list.
The button is greyed out on rows that can't be modulated: the LOCKS rows, a stepper's ACTIVE switch, MODE, DELAY TYPE, VOICE MODE, NOTE SOURCE and the category headings. Stepper rows are only offered on Melody, because stepper Modulators only ever apply to the Melody track. IMPROV rows are only offered on Bass.
See Chapter 12 - Modulate for the full picture, including what happens when all eight Modulator slots are in use.
RESET
Restores parameter defaults at one of two scopes: just the currently selected parameter, or the whole track.
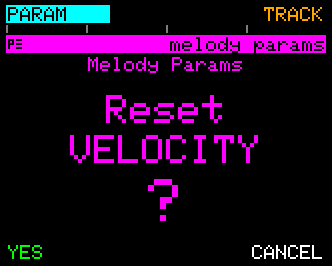
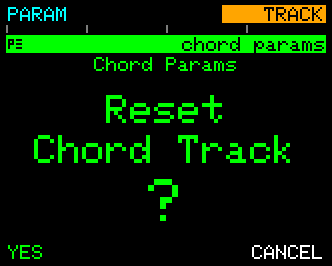
Pressing RESET show a confirmation screen where you pick the reset scope.
- PARAM - resets just the currently-highlighted parameter to its default. Useful when you've dialled something into an odd corner and want a quick undo without losing the rest of your work.
- TRACK - resets every parameter on the current track to its factory defaults, and the track's own pattern with them (the Melody stepper lanes, the Bass line). (Not including LOCKED parameters, see below.)
- YES - commit the reset with the chosen scope.
- CANCEL - back out without changing anything.
LOCK / UNLOCK
Toggles a lock on the currently-selected parameter. When locked, live edits from the PARAMETER Knobs are ignored - you can't accidentally shift the locked value mid-performance by brushing a knob.
Locked parameters show a small lock icon next to their value in the list. Press LOCK again to unlock.
LOCK is only available for the Primary and Secondary parameters.
CATEGORY
Jumps between the parameter categories, saving you the scroll. There are two methods:
- Quick press CATEGORY - jumps the selection to the first parameter of the next category.
- Hold CATEGORY and rotate the CONTROL Knob - cycles through categories in either direction.
Combined with the PARAMETER Knob shortcut for jumping to individual parameters, CATEGORY makes it fast to move around large parameter lists without scrolling item-by-item.
PLAY / STOP
The transport, same as everywhere else. Toggles the sequencer so you can hear parameter changes without leaving PARAMS.
BACK
Returns to the parent mode. Any changes you made are already saved.
The Categories
Parameters are organised into three main categories, in this order:
- PRIMARY - parameters that affect individual notes and steps. This includes the 8 primaries (Pitch, Gate, Velocity, Slice, Octave, Channel, Delay, Layers) plus a few directly related parameters.
- SECONDARY - parameters that affect the sequence as a whole. The 7 knob secondaries (Steps, Rotate, Jump, Direction, Time, Mutes, Accents).
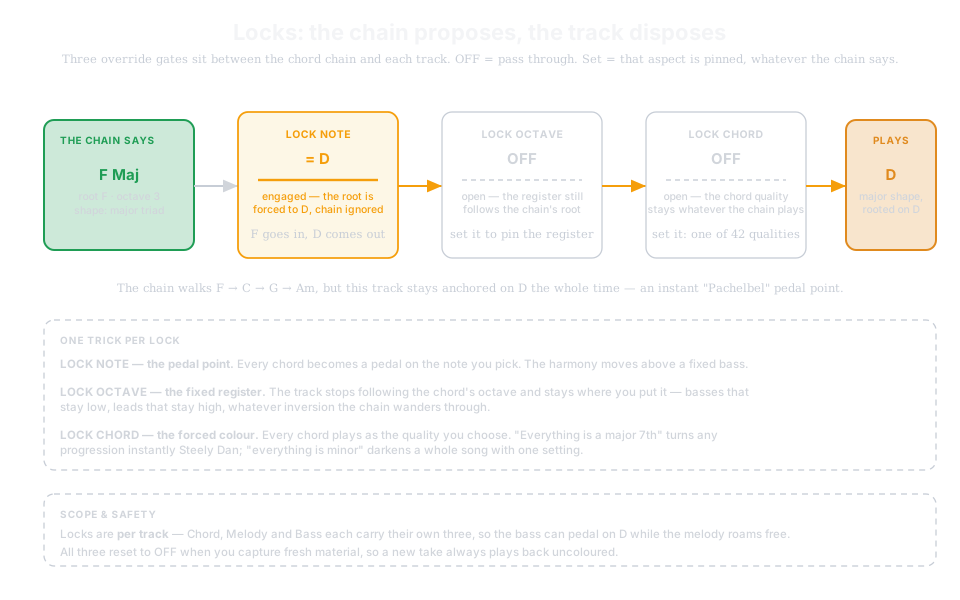
- LOCKS - three "override" parameters that pin the track's voicing against the live chord. Covered in Chapter 8; briefly recapped below.
Plus, on the Melody Track, an additional STEPPER family (one per primary parameter) that Chapter 10 covers in depth.
Knob map
| Knob | Primary (rotate) | Secondary (press-and-rotate) |
|---|---|---|
| 1 | OCTAVE | Tempo (global; not per-track) |
| 2 | CHANNEL | STEPS |
| 3 | DELAY | ROTATE |
| 4 | LAYERS | JUMP |
| 5 | PITCH | DIRECTION |
| 6 | GATE | TIME |
| 7 | VELOCITY | MUTES |
| 8 | SLICE | ACCENTS |
Tempo is a device-wide setting rather than a track parameter; changing it always sticks. See Chapter 13.
Primary parameters - the note shapers
These are the parameters you reach for when you want to change how notes sound - pitch, timing, volume, layering. Eight of them live on the PARAMETER Knobs' primary layer:
PITCH
The scale degree offset for each played note, relative to the current chord's root. Range: -8 to +8 (0 = root of the chord).
Positive values move the note up the scale; negative values move it down. Combined with the chord chain, PITCH is how the Melody Track walks a musical line up and down a chord progression while staying in key.
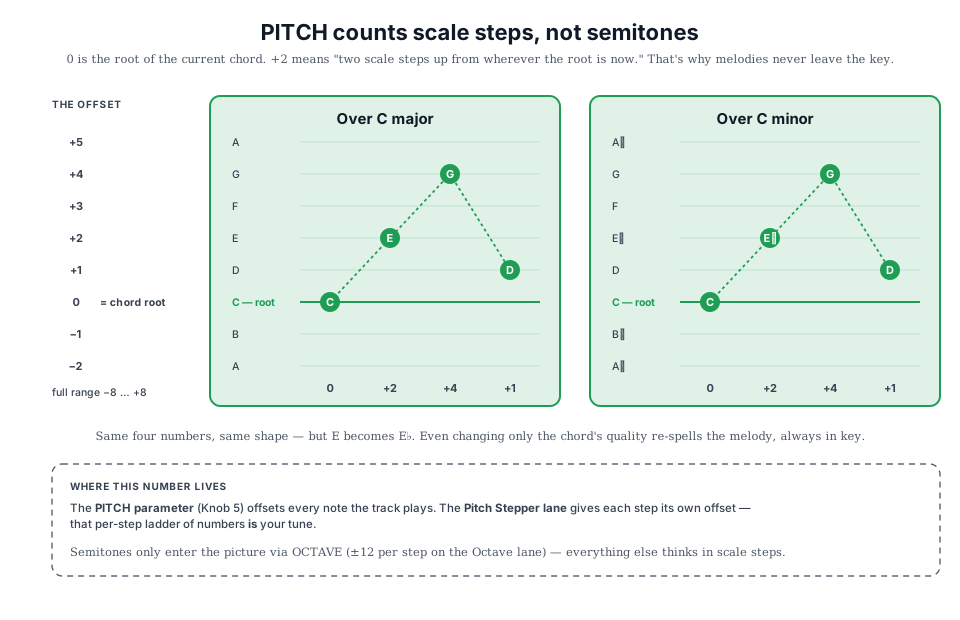
Default: 0 (root).
NOTE SOURCE
Which notes this track is allowed to play. PITCH moves the walk within that set; NOTE SOURCE decides what the set is, and ROOT NOTE below decides where the walk through it starts.
| Source | The notes | Typical size |
|---|---|---|
| CHORD | the chord you are holding, and nothing else | 3-5 |
| SCALE | a scale over that chord | 6-7 |
| BLEND | both at once | 6-10 |
| CHROMA | all twelve | 12 |
Default: CHORD, on all three tracks.
The sequence takes one step per note in the pool, so the size of the set is a zoom control as much as a colour. A sixteen-step sequence spans about three octaves on CHORD, two on SCALE, and barely more than one on CHROMA - where it reads as a chromatic crawl rather than an arpeggio. PITCH, JUMP and OCTAVE all feel different for it, and JUMP 2 on a SCALE source stacks thirds.
Selecting this row does not edit it in place. Tap CONTROL, or press SCALE, and it opens the Scale Options screen, where you can see the set you are choosing and set all three tracks at once. See Chapter 8.
Walking basslines
Bass on SCALE is the single biggest change this setting buys: passing tones between the chord tones instead of root-and-fifth arpeggios.
ROOT NOTE
Where this track calls home: the note its walk starts from.
| Setting | The anchor |
|---|---|
| LOWEST | the lowest note you actually played |
| DETECT | the chord's real root, worked out from the whole chord |
Default: LOWEST, on all three tracks.
The two only ever differ over an inversion. Hold C major as C-E-G and both call C home. Hold it as G-C-E and the lowest note is G, but the chord is still a C: on LOWEST the track treats G as home, on DETECT it treats C as home and the walk is rooted where your ear says it is.
Unlike NOTE SOURCE above it, this row is edited in place - two values is a toggle, not a trip to another screen. Press and turn CONTROL to change it. It also appears on the Scale Options screen, which is where you see all three tracks at once.
The usual pairing
Bass on DETECT, Melody and Rhythm on LOWEST. The bass follows the harmony while the other two stay on the voicing you fingered - so an inverted chord keeps its shape up top and still gets its proper root underneath.
Whenever any track is on DETECT, the Tracks Info views (Chapter 6) show a small G>C read-out - the note you played lowest, then the root UNA detected - so you can see what UNA is making of what you're playing. With every track on LOWEST nothing acts on the difference, so the read-out is hidden.
GATE
How long each note sounds. GATE is an absolute musical duration - a length of time in its own right, not a fraction or percentage of the step it sits on. Range: 1 Tick to 2 Bars, read in ticks at the short end and in bars at the long end.
A tick is UNA's internal timing unit. There are 384 ticks in a bar (Appendix A, and Chapter 16), so in 4/4 a quarter note is 96 ticks, an eighth is 48, and a sixteenth is 24.
Because GATE is absolute, it does not scale when you change TIME. The step duration and the note duration are set independently, and it is the relationship between them that you hear:
- GATE shorter than the step - a gap after each note. Short values give staccato stabs.
- GATE equal to the step - each note fills its step exactly, one running into the next.
- GATE longer than the step - the note rings on past the end of its own step and overlaps the notes that follow. This is how you get legato and pad-like phrasing without touching the Stepper.
Worked example. In 4/4, with 384 ticks to the bar:
| TIME (step duration) | Step length | GATE = 7 ticks | GATE = 24 ticks | GATE = 96 ticks |
|---|---|---|---|---|
| 1/16 (Melody default) | 24 ticks | short stab, ~⅓ of the step | fills the step exactly | rings across 4 steps |
| ⅛ (Bass default) | 48 ticks | short stab, ~1/7 of the step | half the step | rings across 2 steps |
| ¼ | 96 ticks | very short stab | a quarter of the step | fills the step exactly |
Read a row across: the same GATE value gives a different feel on every TIME setting, because the note length stayed put and the step around it changed.
[DIAGRAM - Gate against step duration] A single sequence at one TIME setting, with three GATE values drawn against it - shorter than the step, equal to it, and overlapping into the next; art pending.
GATE is the parameter that gives a phrase its articulation.
Default: 7 Ticks - deliberately short, so every step reads as a separate event until you decide otherwise.
VELOCITY
How loudly a note plays, on the standard MIDI 0-127 scale.
Applies to every note the track produces. If you want per-step variation, use the Velocity Stepper (Chapter 10) or a Modulator (Chapter 12) targeting VELOCITY.
If you want the incoming velocity you played on your keyboard to reach UNA's output, turn on Velocity Sensitivity in Menu > CONFIG (Chapter 17).
Default: Melody 60, Chord 50, Bass 80.
SLICE
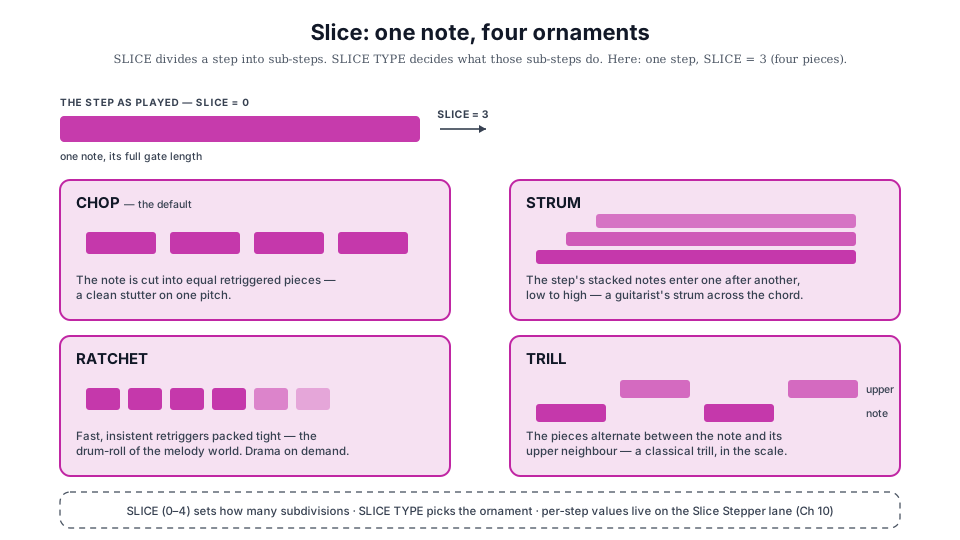
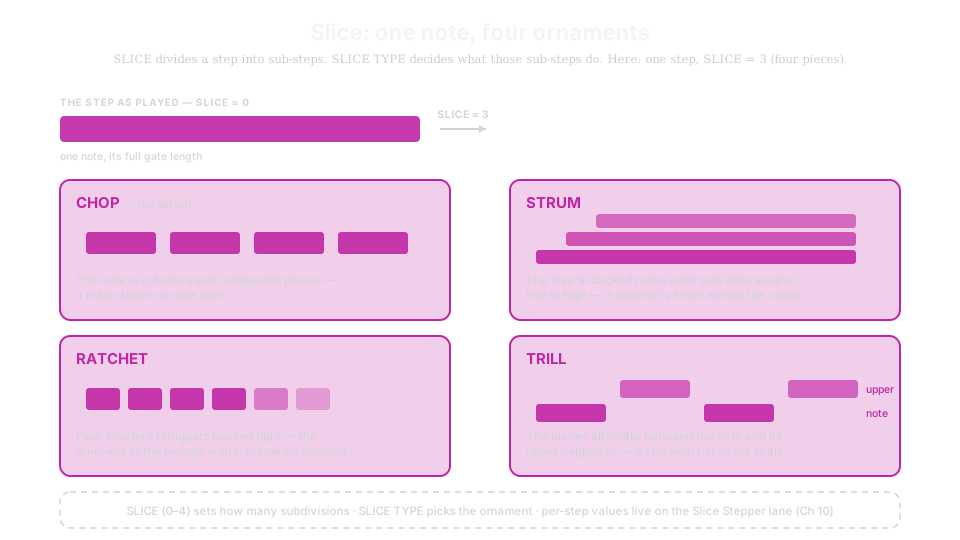
Divides a step into sub-steps ("slices") to create sub-divisions. The screen shows OFF, then 0-3 - higher values put more sub-hits inside each step.
The way each slice sounds is controlled by the SLICE TYPE parameter (below).
Default: OFF (no slicing).
Chord Track quirk: SLICE works on the Chord Track too, and it slices the whole chord - every sub-hit replays all the notes of the chord, not a single note.
The Chord Track's steps are not all the same length. A step lasts as long as its own gap in the Chord Rhythm pattern, so a pattern that mixes long and short steps gets sliced unevenly on purpose: each step is divided into equal parts of itself. A step twice as long gets sub-hits twice as far apart, and the rhythm you drew keeps its shape.
Because Chord Rhythm steps are usually short, the Chord Track is allowed to subdivide more finely than Melody and Bass before it runs out of room - down to a 1/64 note rather than a 1/32. If a step is still too short to hold every slice you asked for, SLICE drops to the most that will fit rather than cramming them in.
OCTAVE
Vertical position of the track's notes, expressed as an offset from the natural octave. Range: -3 to +3.
At 0, the track plays around C3; positive values move it up, negative down.
The exact octave a note lands in depends on the current chord's root plus this offset - unless LOCK OCTAVE is on (see Locks below), in which case OCTAVE fully controls vertical position.
Default: 0 (C3).
CHANNEL
Which MIDI channel the track transmits on. Range: 1-16.
Each track has an independent MIDI channel, so you can route them to different synths in your rig (Chapter 15).
Default: 1 for all three tracks.
Where channels are stored. By default the three channels are device-wide (Menu > CONFIG > Track Channels = Global, Chapter 17): editing CHANNEL changes the shared channel for that track in every patch, and the value stored in the patch is left untouched. Set Track Channels to Per Patch and each patch stores and restores its own channels instead.
DELAY
A per-step timing offset that pushes the track's notes forward in time, applied according to the DELAY TYPE parameter (below). Range: 0-99%.
At 0 there is no offset; higher values delay more. It's useful when combining with other tracks to create alternating beats.
Combine with DELAY TYPE = SWING for a swing feel; leave at ALL for a straight offset, pushing every note forward by the same amount.
Default: 0%.
LAYERS
How many notes the track plays at once, drawn from the current chord. Range: 1-4.
At 1, a single-note line is played (typical for Melody and Bass). Higher values add stacked notes - useful for octave doubling on Bass or for beefier melody lines.
Default: 1.
The Chord Track has an "As Played" that matches the layers to the number of notes in the chord. So if you press 10 keys, a 10 note chord will be heard.
Additional "Behaviour" Parameters
These parameters live in the PRIMARY group in the PARAMS menu but don't sit on a PARAMETER Knob directly.
MODE (Chord Track only)
Toggles the Chord Track between CHORD (rhythmic) and DRONE (sustained pad). Chapter 8 covers the full behaviour of both.
Values: CHORD (default), DRONE.
On the Melody and Bass tracks, MODE is disabled.
VOICE MODE
Sets whether the track voices notes polyphonically or monophonically.
- POLY (default) - multiple notes can overlap. Standard behaviour, good for pads, melodies, and lines that use LAYERS.
- MONO - only one note at a time; a new note-on cuts the previous note off. Good for classic mono synth leads and basslines where you want each note to bite cleanly.
DELAY TYPE
Controls how the DELAY value is applied across the sequence.
- ALL - DELAY nudges every step by the same amount.
- SWING (default) - DELAY offsets only the even-numbered steps (steps 2, 4, 6…), giving a swing feel. The higher the DELAY, the more shuffled the pattern.
SLICE TYPE
When SLICE is on, SLICE TYPE picks which subdivision behaviour is used. Range: one of several ornament algorithms (Chops, strums, ratchets, and trills).
Default: CHOP.
Chord Track quirk: the two strums and the two trills rotate the chord. Each sub-hit plays the same chord one inversion further on - C-E-G becomes E-G-C, then G-C-E - climbing an octave at a time for the UP variants, falling for the DOWN ones. It's the closest UNA gets to a strummed guitar chord. CHOP and RATCHET replay the chord unrotated.
Secondary parameters - the sequence shapers
Where primary parameters affect individual steps, secondary parameters affect the whole sequence - its length, order, rhythm pattern, and speed. All seven live on the PARAMETER Knobs' secondary layer (press-and-rotate).
STEPS
The length of the track's sequence, in steps. Range: 1-32.
Default: 4.
Combined with the TIME parameter, this decides how long a full loop lasts. Shorter STEPS with a fast TIME gives a busy, repetitive loop; longer STEPS with a slow TIME gives a spread-out, breathing part.
STEPS sets the length of the basic sequence. How long the music runs before it repeats also depends on Modulators and on the lengths of the individual Stepper patterns: patterns of different lengths repeat at different points, so together they run much longer than STEPS.
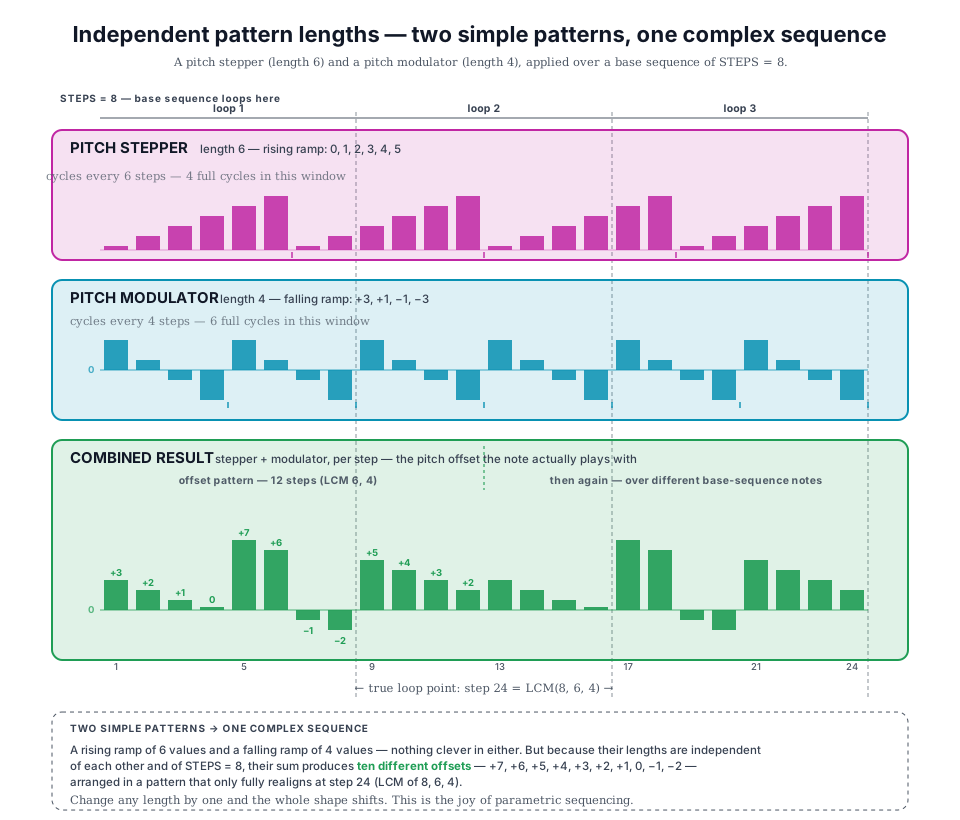
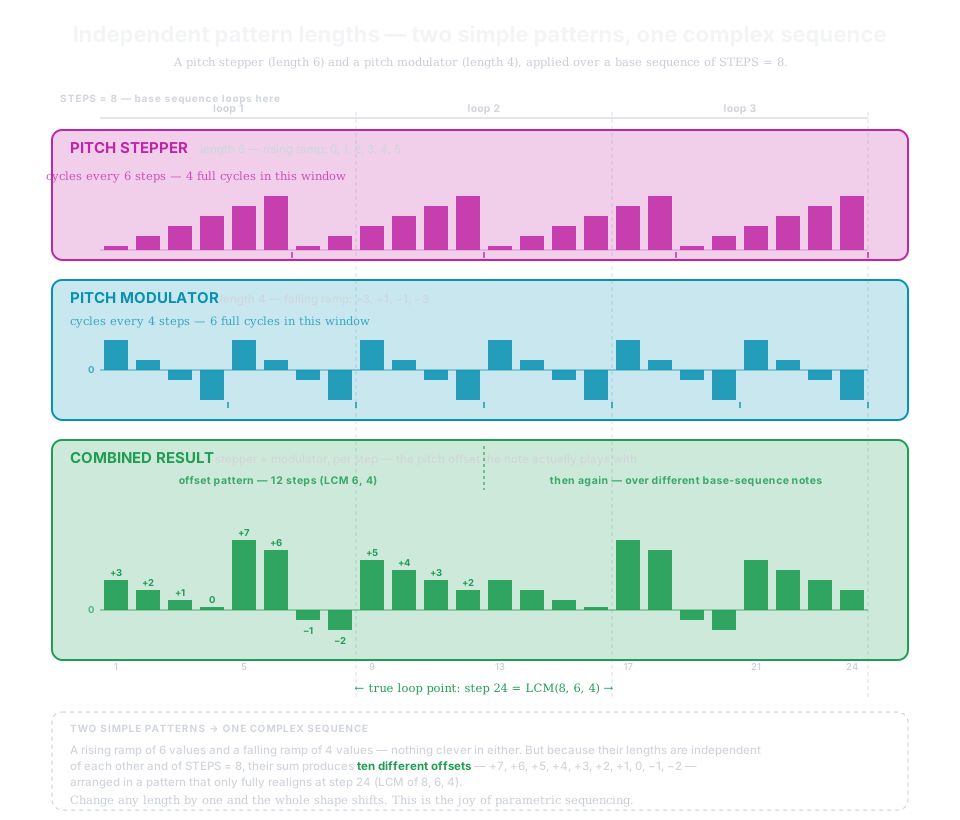
Chord Track quirk: default is 32 - the Chord Track's STEPS defines the length of the rhythmic pattern used for Mutes and Accents.
ROTATE
Shifts the whole step pattern forwards or backwards without changing its content. Range: 0-32. At 0, no rotation; higher values move step 1 further into the sequence. Useful for landing a pattern's downbeat on a different beat of the bar.
Default: 0.
JUMP
Skips through the sequence in jumps rather than one step at a time. Range: 1-3. At 1, plays every step in order; at 2, plays every other step; at 3, every third. Combines with DIRECTION for polyrhythm-style walks.
Default: 1 (no jump). Chord Track quirk: locked to 1.
DIRECTION
The order steps play in. Range of options: Forward, Reverse, Switch Inclusive, Switch Exclusive.
Forward is the natural order (1, 2, 3…); reverse plays backwards; Switch plays forwards then backward, repeating the end notes (inclusive) or not (exclusive).
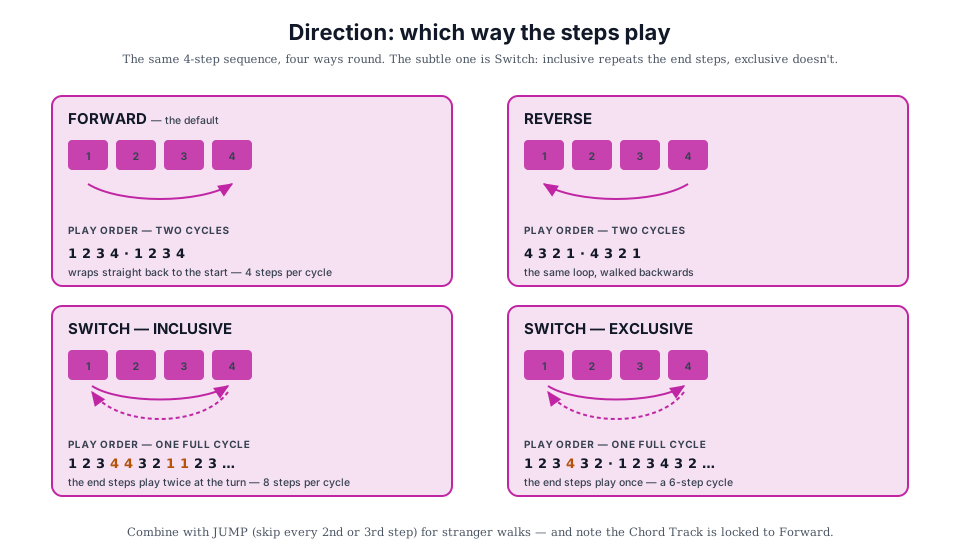
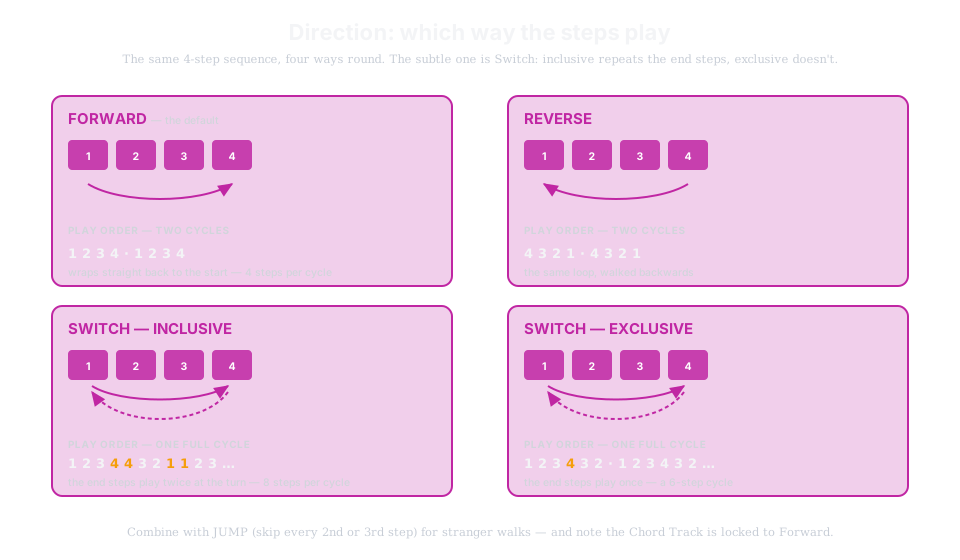
Default: forward.
Disabled for Chord Track, locked to forward.
TIME
How long each step lasts, expressed as a musical duration (1/16, ⅛, dotted eighth, ¼, and so on). This is the single biggest control over how fast your track plays.
Together with STEPS, it decides the total length of a loop. Different values on different tracks give you polyrhythms without doing anything else.
Default: Melody 16, Bass 8 (notes per bar).
MUTES
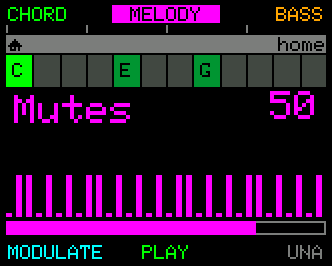
A 32-step Euclidean mute pattern that decides which steps of the sequence don't play - silencing chosen steps to shape a rhythm.
Range: 0-64 patterns.
When you rotate MUTES, a live preview of the pattern appears on-screen: 32 small bars, each either tall (playing) or short (muted). Combined with STEPS and ACCENTS, it's one way to turn a sequence of notes into a groove.
Default: 0 (all steps play).
ACCENTS
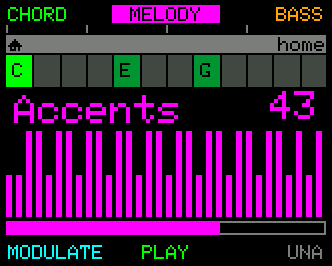
A 32-step Euclidean accent pattern that decides which steps of the sequence play louder - the opposite twin of MUTES.
Range: 0-64 patterns.
Same live-preview visualisation: 32 small bars, taller ones = accented steps.
The Accents Amount Global (Chapter 17) sets how much louder an accented step is compared to normal.
Default: 0 (no accents).
LOCKS - the override layer
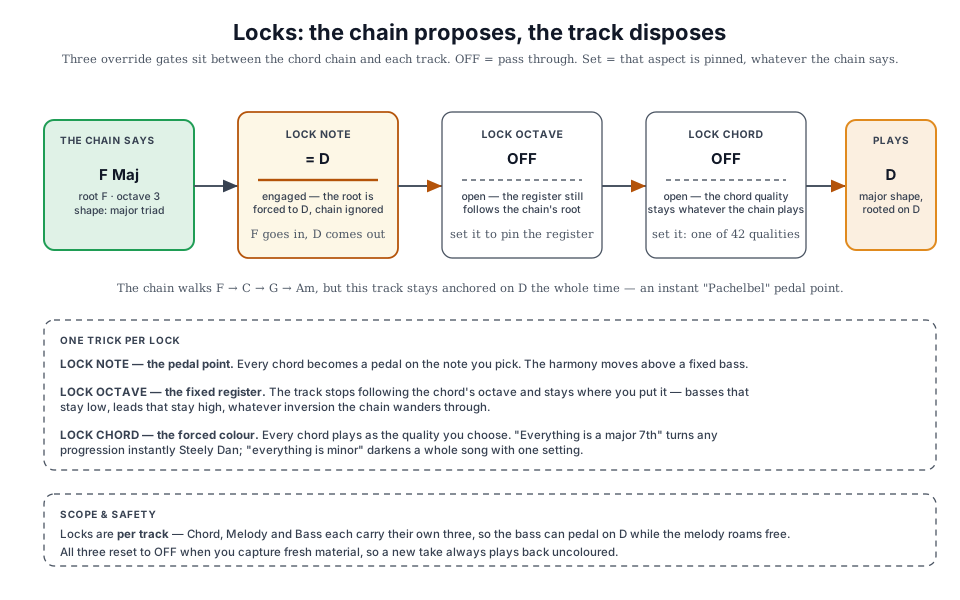
Three "override" parameters that pin the track's voicing against whatever chord is playing:
- LOCK OCTAVE - fixes the octave to whatever OCTAVE is set to, ignoring the live chord's octave (root).
- LOCK NOTE - overrides the root pitch class. Values: OFF (default), C-B (pick one of the 12 semitones).
- LOCK CHORD - overrides the chord's intervals. One of 42 chord qualities (Major, Minor, 7th, 9th, sus4, dim, etc.). Same list as Chord Select.
All three default to OFF and reset to OFF on a fresh capture so recorded material plays back uncoloured. Locks are used for compositional tricks like pedal points (LOCK NOTE), forced octave range (LOCK OCTAVE), or "every chord plays as augmented" (LOCK CHORD).
STEPPER parameters (Melody Track only)
Each of the 8 primary knob parameters (Pitch, Gate, Velocity, Slice, Octave, Channel, Delay, Layers) has its own Stepper - a 32-step lane of per-step values.
Chapter 10 is the deep dive on the Stepper: how to edit, morph, load, save, and shape each lane.
The Stepper appears in the PARAMS menu as a group per parameter (PITCH STEPPER, GATE STEPPER, etc.), each containing:
- LENGTH - the number of active steps in this lane.
- ROTATION - shift the lane forwards or backwards.
- MORPH AMOUNT / MORPH FREQ - wave-based transformation of the lane values.
- SHAPE RANGE / SHAPE INVERT - scale and invert the morphed values.
- FLT EUCLID / FLT DEVIATE - Euclidean thinning and randomised deviation.
- ACTIVE - turn this lane on or off without losing its values.
If you're editing individual step values, you'll almost always do it from the Stepper's own EDIT sub-mode rather than this parameter menu - but the menu is here for when you want to tweak a lane's overall shape.
Cross-references
- Chapter 5 - Core Concepts: the mental model behind primary/secondary and how parameters relate to tracks.
- Chapter 6 - Home: the PARAMETER Knobs in live use; Temporary and Targeted edits.
- Chapter 8 - Chord Mode: full LOCKS deep dive; MODE (CHORD/DRONE); Chord Track-specific parameter behaviour.
- Chapter 9 - Melody Mode: the Melody Track's PARAMS entry point.
- Chapter 10 - The Stepper: per-step editing on the Melody Track.
- Chapter 11 - Bass Mode: the Bass Track's PARAMS entry point plus IMPROV parameters.
- Chapter 12 - Modulate: how Modulators target any parameter to evolve it over time.